How do I create a Test VSA?
Problem:
I would like to create a test VSA. What are the steps I need to take?
Resolution:
You can either create a brand new clean test VSA or you can use the data from your existing production server for your test VSA. The steps for both scenarios are outlined below.
OPTION 1: Clean Test VSA:
- Simply install a new Kaseya VSA following these steps
OPTION 2: Copy of your existing production VSA:
(Please Note: This will need to be done during a maintenance window)
(Please Note: This article assumes that you will install Kaseya on the same disk drive ('C:' or 'D:') as your production server - There are hard-coded path references in the database. If you install Kaseya on a different drive letter, these will need manual update, please let support know accordingly.)
On your production server:
- Important, please make a note of the collation of the ksubscribers database, the reason has been explained here
- Back up the 'ksubscribers' database from "System>Configure>Backup Now" and copy this completed backup to a backup folder. (Example: 'D:\KaseyaServerBackup`)
- Please stop all the Kaseya services
- Copy "C:\Kaseya\WebPages\ManagedFiles" and all sub-directories (Important: excluding VSAHiddenFiles) to the same backup directory. (Example: "D:\KaseyaServerBackup\ManagedFiles")
- Copy "C:\Kaseya\UserProfiles" and all sub-directories to the same backup directory. (Example: "D:\KaseyaServerBackup\userprofiles")
- Restart all the Kaseya Services
On your new test server:
- Install SQL using the same collation as the "ksubscribers" database you have on your production server.
- Download the kaseya installer (download.kaseya.com/kinstall.exe)
- Run through the installer to install Kaseya without any data
- Stop all the "Kaseya" services and the "World Wide Web Publishing Service"
- Copy "ManagedFiles" and all sub-directories (excluding VSAHiddenFiles) from your backup folder. (Example: "D:\KaseyaServerBackup" to "C:\Kaseya\WebPages\ManagedFiles")
- Copy "UserProfiles" and all sub-directories from your backup folder. (Example: "D:\KaseyaServerBackup" to ""C:\Kaseya\UserProfiles")
- In SQL management studio, restore the database that you previously copied to the backup folder. Please make sure you choose to overwrite the existing database from options tab in restore window
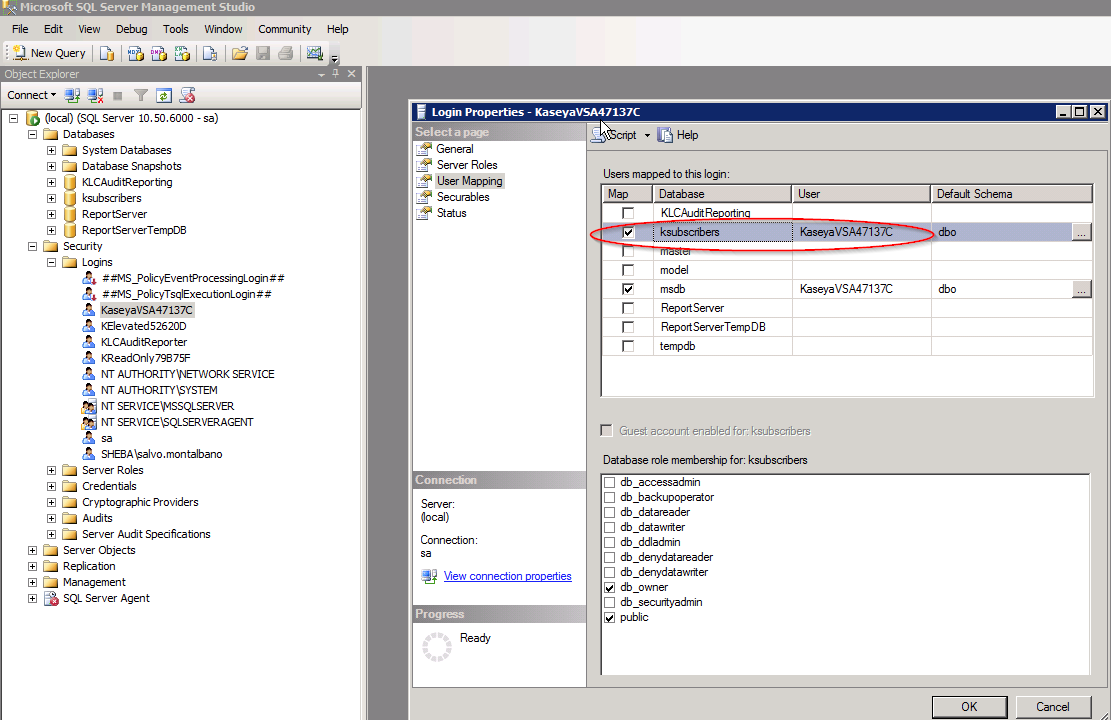
- In SQL management studio, locate user with name starting KaseyaVSA and map it to newly restored "KSubscribers" database

- Start all the "Kaseya" services and the "World Wide Web Publishing Service"
- Then click "Start" -> "Programs" -> "Kaseya" -> "Reinstall Database Schema". Please contact Kaseyasupport if you see any schema fail error message.
These instructions are relevant to on-premise VSA installations only.
If you think this article can be improved, please add a suggestion in the 'Comment' box below!