We have provided two potential solutions below. The first solution has been tested and approved by Kaseya. Stage 2, Option 2 has been graciously provided to Kaseya by a respected Community member, Eric Nemchik of KeeFORCE. While the community-provided solution has not been tested by Kaseya, some customers have reported success with this approach. If you choose to follow either of the solutions below, Kaseya strongly recommends testing the solution(s) on sample/test machines prior to a large-scale rollout.
NOTE: Although the Kaseya-tested solution has been tested by Kaseya Specialists on 32 and 64 bit Operating Systems, we strongly advise that you test this in your environment before running this en-masse, as the behaviour may differ in other environments.
Please be aware:
- You must complete BOTH Stage 1 AND Stage 2 below
- In Stage 1, you should complete both Option 1 and Option 2 in order to properly locate the affected endpoints and create the required custom fields associated with the procedures supplied in Stage 2.
- In Stage 2, you may select either the Kaseya Tested and Approved Solution or the Community-provided Alternate Solution
Stage 1 - identify the machines that have been affected
Option 1 - Audit the machines
Schedule an audit on all the possibly affected machines. This will allow a view to be created looking at machines with AVG 2015 installed.
Please note that you should schedule the audits using the distribution window option as this will put a load on the Kaseya server if you have a large number of machines.
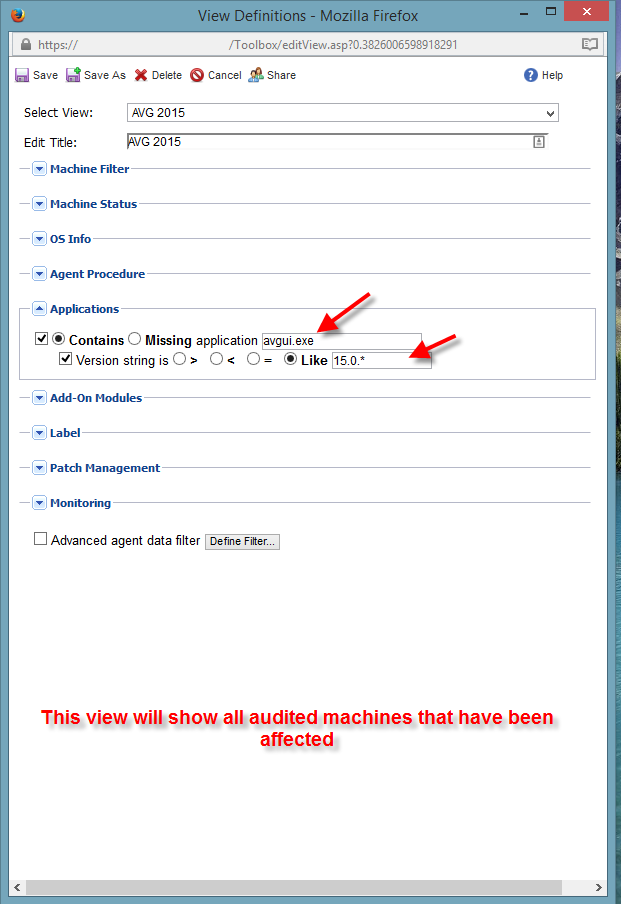
Create a view called "AVG2015-audit" that looks at the following information
Application Name = AVGUI.EXE
Version String Like 15.0.*

Please note, this will only work for machines that have been audited and have returned the audit data to the kaseya database since AVG2015 was installed.
Option 2 - Run an agent procedure to check the AVG version
1. go to the Audit Tab -> System Information page
2. click the "New Custom Field"
3. name this "AVGVersion", set the field type "String"4. Import the attached procedure (Check AVG Version) on any machine that you think may be affected - attached.
This will look to see which version of AVG is installed and store the version number in the Custom Field created in step 2
5. Create a view called "AVG2015-proc" that looks at the following information
- Advanced agent data filter "AVGVersion" - AVG2015

Stage 2 - Remove AVG 2015 using the AVG removal tool
Kaseya Tested and Approved Solution (stage 2)
Now that we have a view that shows the affected machines, we need to remove AVG2015 from them
1. import the procedure (AVG 2015 removal) - attached
2. run this on the machines that you want to remove AVG 2015 from.
This will download the AVG removal tool and run it automatically on the machine.
NB
This procedure has the /norestart option selected, to avoid unexpected shut-downs.
You can remove this from the procedure if you like, or better still insert your reboot preference in Step 8 - maybe you want prompt the user to reboot, or just force a reboot (I will leave this up to you).
Modify step 1 of the procedure to have the correct email address. The procedure will send an email to that address with a message once the process is complete for that agent.
Before attempting to "Connect Client", to reinstall KES on the endpoint, you must have performed a reboot.
NB
This has been tested in-house, but we would advise that you test the removal process on a single machine or small number of machines first, before pushing it out to all affected machines - different environments may behave differently, so be sure that you are happy with the procedures actions.
Community-provided Alternate Solution (stage 2)
Thank you to Eric Nemchik of KeeFORCE for providing the Kaseya Community with this alternate procedure
- Download and import the procedure attached to this article, "CommunityProvided-AVG2015Removal"
- Optionally, remove the last line in the community-supplied procedure (to updateSystemInfo)
- Optionally, add a sendEmail step to the end of the community-supplied procedure to notify recipients
- Run the procedure on affected endpoints
- Navigate to the KES module, select the affected agents, and click the "Connect" button
- Reboot the endpoint(s)
- After reboot, navigate to the KES module, select the affected agents, and click the "Install" button