ISSUE
These steps can be used as a rough guide on how to use Diskshadow to truncate Exchange logs. As always, contact Microsoft for exact steps for your exact Operating system and application version.
One of the most common stories is that without a working Exchange Server backup when you perform massive mailbox moves, transaction logs will get piled and fill up the volume or disk that they reside in. and then panic starts, “hey my databases were dismounted…” then of course the administrator realizes that the space on the log drive or volume has indeed ran out and now he needs to figure out what to delete.. and here’s where this post comes in…
So how can you delete or purge Exchange server logs without any risk ? well, in simple – you cannot, because the whole idea of restoring an Exchange or for this matter any transactional database requires you to have a first – “full” backup of the database itself and all transaction logs that were generated since the the date of the database creation date, or the last “successful” “full backup”.
Now here’s a nice method to “fake” a “full backup” or an on-demand transaction logs purge when you see you will be soon out of space, using the Exchange VSS writers and the diskshadow utility. This procedure also “proves” that a VSS backup for your Exchange Server will work fine.
RESOLUTION
You should preform a “Full Backup” right after this process is done.
This example will show you how to purge the logs for a database that is located on Drive D, the log files of the databases are also located in Drive D. we will “fake backup” drive D and this will trigger the logs to be purged.
Note: If you have separated your log files and database file in different drives, or you want to include additional databases in the “backup” you must include the additional drives in the process, so in the example below, you will “Add volume e:” after “Add volume drive d:” and so on…
- Open Command prompt
-
Launch Diskshadow
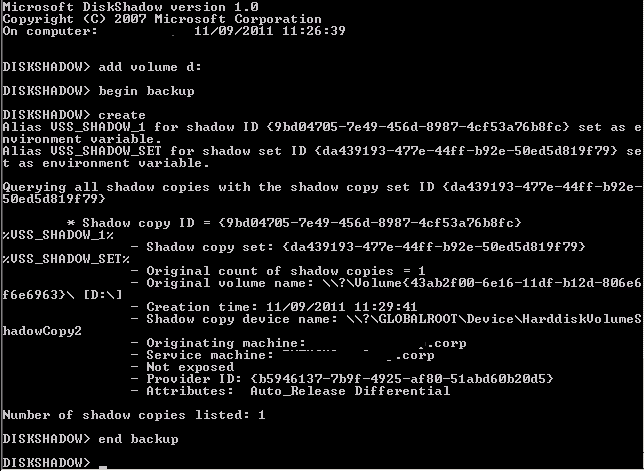
- Add volume d:
- (optional, add one line for each additional drive to include) Add volume X:
- Begin Backup
- Create
- End Backup
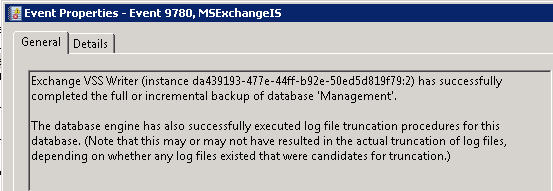
- At this step you should notice the following events in the application log indicating that the backup was indeed successful and logs will now be deleted.
Here’s some screenshots from the process:

The Diskshadow example screenshot.
ESE – Event ID 2005 – Starting a Full Shadow Copy Backup

MSexchangeIS – Exchange VSS Writer preparation.

ESE Event ID 224 – Logs are now purged

MSExchangeIS Event ID 9780 – Backup is now complete.
