Question
How do we configure Egnyte for SAML Access.
Answer
To configure Egnyte in the Single Sign On Manager please follow these steps
- Select Directory Manager.
- Select Groups.
- Select the green plus sign in the bottom right corner.
- Name the Group Egnyte Users.
Note: If you have other existing Groups for SSO users you can use one of these as well. - Select ADD GROUP.
- Select SSO Manager.
- Select the green plus sign in the bottom right corner.
- Select the Catalog Icon.
- Select Egnyte from catalog.
- Select Application is Enabled.
- Select Protocol Setup.
Update the Assertion Consumer Service URL to reflect your own Egnyte domain. - Select Add Application.
- Select Permissions.
- Select Add Groups.
Select the Group you chose in Step 4. - Select Signing and Encryption.
- Select Copy.
Copy the encoded certificate like this sample including the
-----BEGIN CERTIFICATE-----
-----END CERTIFICATE-----
Note: Save this using a notepad document using a .CER file type. You will need this for the Egnyte portion of the configuration. - Select Save Changes.
Configuring Egnyte for Single Sign On
- Log in to the Egnyte Admin console, and navigate to the Configuration tab.
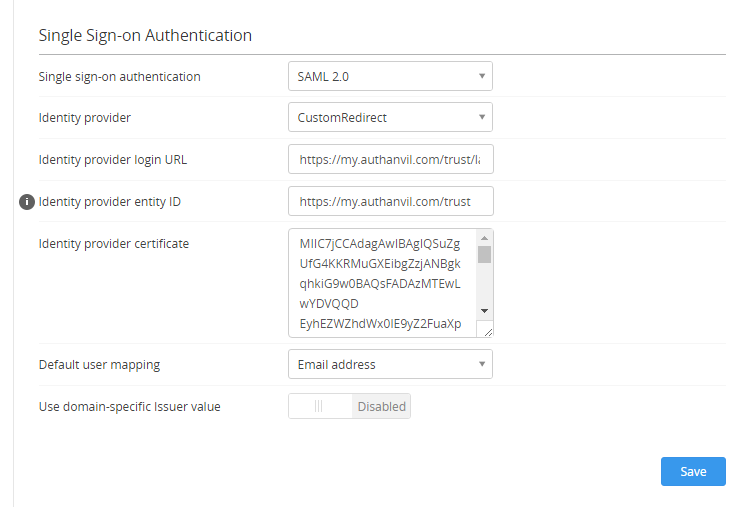
- Select Security & Authentication from the left menu. Scroll down to the Single Sign-on Authentication section. Select SAML 2.0 authentication, with CustomRedirect as the IdentityProvider. Fill out your SSO details for login URL and entity ID.
Note: CustomRedirect has been replaces by Generic HTTP POST.
Enter the information copied from Passly in the text boxes provided:
Issuer URL:Issuer URL https://(Your On-Demand Tenant)/trust
SSO Endpoint: SAML2.0 Endpoint (HTTP) URL https://(Your On-Demand Tenant)/signin
SSO Logout Endpoint: SLO Endpoint (HTTP) URL https://(Your On-Demand Tenant)/apps
Note: Replace https://(Your On-Demand Tenant) with your actual tenant URL
Certificate: X.509 Certificate - Paste the encoded certificate (without the BEGIN CERTIFICATE or END CERTIFICATE parts) into the Identity Provider Certificate field.
Leave the Default user mapping as Email Address - Save the settings.
Users in Egnyte must be manually enabled for SSO. To enable a user, complete the following steps. 
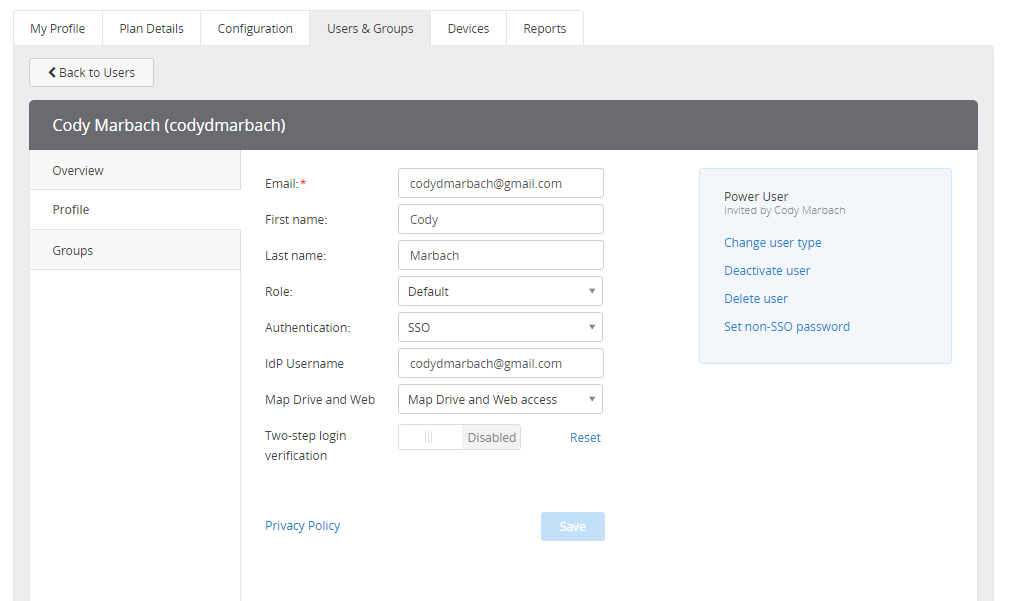
- Go the the Users & Groups tab in Egnyte Admin console
- Select a User to view their details
- Select Profile from the left menu
- Change their Authentication to SSO
- Enter their AuthAnvil On Demand principal name as the IdP Username
- Save the settings.
To verify, have the user sign in. They should be redirected to AuthAnvil On Demand after entering their Egnyte username or email address, and begin the authentication process.