Passly supports two forms of Single Sign-On.
- SAML Applications. (Security Assertion Markup Language)
- Browser Extension powered form filled injection.
SAML Applications
Supported Applications
Kaseya support for adding SAML Applications.
-
Kaseya Modules that support SAML added from the SSO Manager via the SSO catalogue.
Traverse, VSA, BMS, IT Glue are examples of Kaseya Modules available for SAML. You can find their setup guides here. - Web based logins created in the Password Manager leveraging web-form filling injection. Documentation is available here.
- Supported 3rd party applications that have been tested and added to the Catalogue via SSO Manager > Application Library. These applications are indicated by the label "Federated (SP-Init), Federated (IdP-Init)". These applications should be documented here.
- Unsupported 3rd Party Applications. Kaseya provides limited support for 3rd party SAML Applications. There is no guarantee that all SAML apps will be compatible. There are no restrictions from a Product standpoint however the support team can only assist with those applications that appear in the Catalogue. Kaseya will not be able to provide assistance with any application that is not tested and documented in the catalogue.
Additional SAML Resources
SAML 2.0 guide.
Configuring Applications
Once you have managed your users and groups directly through Passly, you can choose how you want third party services/software to interact with Passly through the Single Sign On (SSO) Manager. To manage your SSO applications, click SSO manager from the sidebar.
From here, you will see all of the Applications already added to your library. Passly offers hundreds of websites and services that are compatible with the SSO Manager, from Amazon to Zendesk.
To add a new SSO application to your library, click the button. There are two types of applications we support
SAML / WS-Federation
Passly SSO supports applications that are SAML 2.0 or WS-Federation compatible. These applications can be accessed from the Launch Pad.
Once you select the option to manually add a new application to the library, you can select from the list of compatible applications using the search function, or scroll through the list on screen. Once you find an application you would like to add, click its name or icon to continue the setup process.
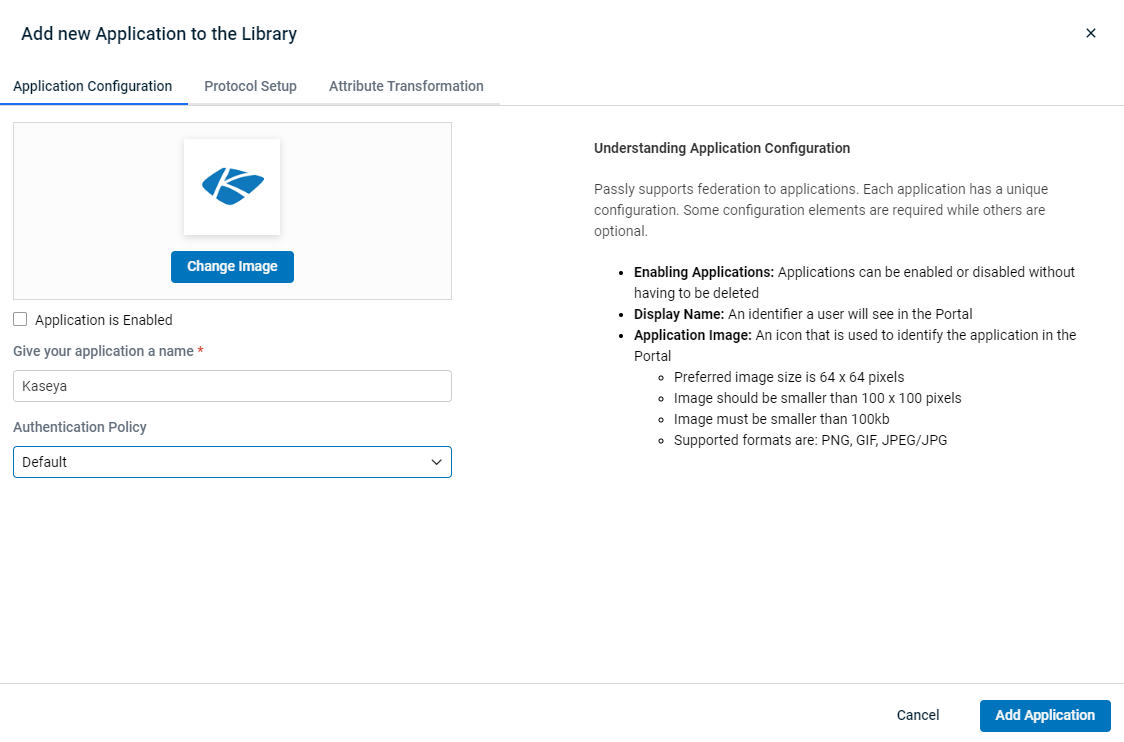
Application Configuration

The first screen that will appear is the application configuration screen. In order for your application to be added to your library, you’ll need to configure the following settings:
- Application Image: This option allows you to set an icon that identifies the application in By default, the application image is the logo of the selected organization, in this case being the O365 logo. In order to replace the image, it should be less than 100x100 pixels (though 64x64 pixels is recommended), smaller than 100kb, and a supported format (PNG, GIF, JPEG/JPG).
- Application Name: This is the identifier used in the portal. It is recommended that you select a Display Name that properly describes the function of the portal application.
- Authentication Policy: This is the authentication Policy a user within the application’s database will use to access Passly following provisioning. For more information, see Authentication Policies.
Note: When you’re ready to activate the application, make sure “Application is enabled” is selected. By default, the application won't show in anyone's Launch Pad when initially added because no permissions have been granted.
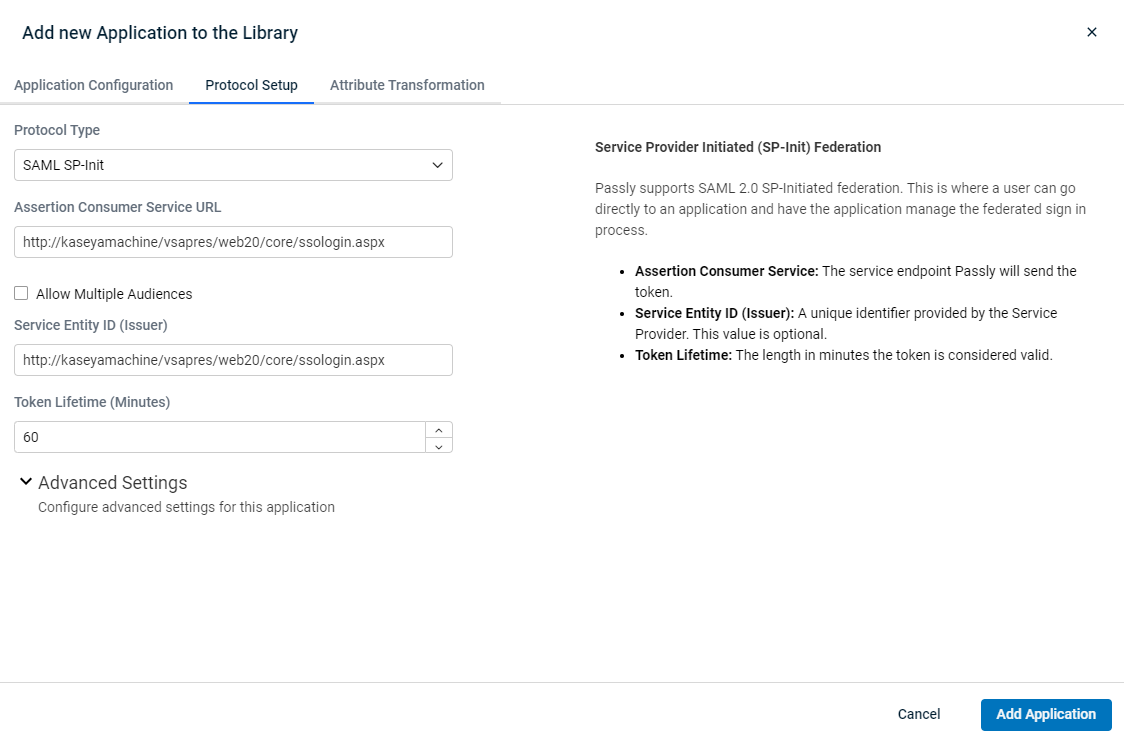
Protocol Setup

This screen allows you to configure the SSO settings for the application. If you do not know them, and aren't using one that's pre-configured, you will need to check the documentation for the other application.
There are three main options under the main protocol type list:
- SAML SP-Init - Service Provider Initiated SAML. With this option, the SP (application you’re logging into) will redirect you to Passly for Authentication. You can also login directly from the Launch Pad in Passly.
- SAML IdP Init - Identity Provider Initiated SAML. With this option, your users will go from Passly to the other application. In most cases, the users, if they know their credentials, can also login directly to the other application.
- WS-Federation - Another protocol that supports SP-Initiated functionality. This is primarily used by Microsoft and is how the Office 365 application will be configured.
Additionally, there are more fields to consider when configuring Application Protocols:
- Assertion Consumer Source URL: This is the URL that is used to initiate communication between the audience and the application.
- Audience URI: This is where requests typically originate. If there are multiple, you can check the box for Multiple URIs and enter them.
- Service Entity ID (Issuer): This will typically be the primary URL of the site that is being authenticated.
- Identity Issuer: This is the Passly URL that the other application will call. Typically, it is found in the format https://{tenantname}.my.passly.com/trust
Attribute Transformation
Attributes allow you to customize properties specific to your application by entering in an Attribute Value and a Send As field. Typically, Attribute Values contain User. followed by the attribute (ex: {User.PrincipalName}. Attributes can also be created from the Authentication Policy creation screen (See: Adding Authentication Policies).
Once you are finished customizing your new SSO application, click “Add Application”.
Web logins
For applications that do not support SSO, you can add these to the Single Sign On Assistant browser extension.
The browser extension allows for direct credential saving and form-filling all in one. The passwords for these websites will be stored in your Passly Password Server.
To begin, Add the extension to Chrome, Edge (Chromium core), Firefox to get the most out of your Passly SSO Manager. Google Chrome Webstore, or click the following links:
- Chrome / Edge https://chrome.google.com/webstore/detail/authanvil-sso-assistant/mggmjmfbekbnaibbcocedihmfkificlb
- Firefox https://addons.mozilla.org/en-US/firefox/addon/passly/?utm_source=addons.mozilla.org&utm_medium=referral&utm_content=search
There are a couple different ways to take advantage of this extension.
Saving credentials
When you log into a website that you have not visited before with the extension installed you will notice that it will prompt to save the credentials for you. These will be saved to the Vault you choose in Passly stored using AES256 encryption and strong 2FA enforcement for access.
You can also manually create these in your individual vault or share them in a Shared Vault. Please check out this KB for information on the Passly integrated Password Manager. Here you will be able to find help creating your own Vaults.
Usage while logged. If you are already logged into your tenant you will notice that the extension will pick up the active browser session.
We can also use the same extension for web launching of the App
- In your browser click the Blue cloud Icon.
- Now select "My Passwords"
- Selecting the Password record will bring it into focus. Select the URL to launch the app in a new tab.
You should see be logged directly into the website so long as the username/password/URI are entered accurately.