Microsoft 365 Integration
Passly supports federated sign-in and synchronization with Office 365. In this guide you can find all information about integration with Office 365.
Step 1. Create Office 365 application in your Passly Tenant
-
Select Directory Manager→ Groups.
-
Hover over the Blue button in the bottom right corner → Create New Group
-
Name the Group Office 365 Users → Select Add Group.
Note: If you have other existing Groups for SSO users you can use one of these as well.
-
Select SSO Manager.
-
Select the Blue button in the bottom right corner → Add new Application to the Library.
-
Select Office 365.
-
Select Application Configuration.
Ensure that the Application is enabled.
- Select the desired Authentication Policy.
- Select Save changes.
Step 2. Register application in Azure
To make requests using Microsoft Graph API you need to register an app in Azure Portal. Passly supports a synchronization using a daemon app registration in an Azure Portal.
To Register an daemon application:
- Go to Azure Portal https://portal.azure.com/#home as a Global Admin.
- Click on Azure Active Directory.
- Select App registrations on the left manage panel.
- Press New registration.
- Type a name of your application, for example “passly app”.
- Select Supported account types for an application.
- Press Register button.
- Detailed info how to register an app in Azure Portal https://docs.microsoft.com/en-us/graph/auth-register-app-v2.
App permissions
Azure AD assigns a unique application (client) ID to your app. You need to give permissions to your application. A daemon application can request only application permissions to APIs (not delegated permissions).
On the API permissions page for the application registration, after you've selected Add a permission and chosen the API family (Microsoft Graph), choose Application permissions, and then select your permissions.
-
Select API permissions, and then select Add a permission.
- On the Request API permissions page, locate Microsoft Graph.
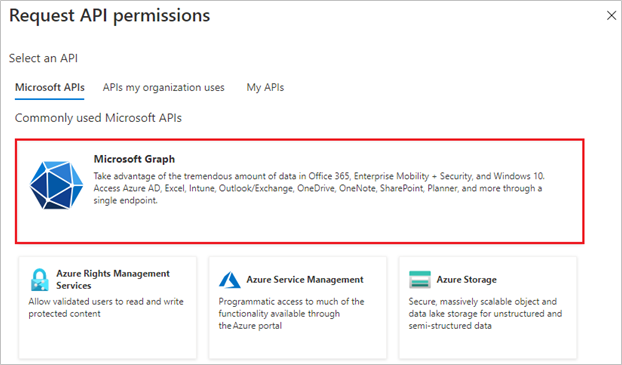
-
On the Required permissions page, select Application Permissions and then select below permissions to enable the sync:
Group: Group.ReadWriteAll
Domain: Domain.ReadWrite.All
User: User.ReadWrite.All
Directory: Directory.ReadWrite.All -
On the Reporting API Application - API Permissions page, select Grant admin consent so the status column of the permissions table contains “Granted for <domain_name>“ status.
Roles and administrators
-
App registration must be a member of Global Admin role to be able to federate a domain. In
Azure Portal-> Microsoft Entra ID -> Roles and administrators page search for Global Administrator role.
- Select that role and click on Add assignments. Search for your app registration name “passlyapp“, select it and press Add.
Add certificate
As with any confidential client application, you need to add a secret or certificate to act as that application's credentials so it can authenticate as itself, without user interaction.
-
To get a certificate go to Passly SSO Manager → Application Library → Your Office 365 application → Singing and Encryption.
There should be a valid signing certificate. Press download button to save it locally.
To upload a certificate to your Azure app registration:
- Select Certificates & secrets → Certificates → Upload certificate
- Select a previously downloaded certificate
- Add a description
- Press Add
You can check the thumbprint of an uploaded certificate that should be equal to the one from Passly tab.
Detailed information on how to grant permissions and add a certificatehttps://docs.microsoft.com/en-us/azure/active-directory/develop/scenario-daemon-app-registration.
Step 3. Set up Office 365 in your Passly Tenant
Passly supports federated sign-in and synchronization with Office 365. There are 2 ways how you can set up Office 365 integration: Microsoft Online and Microsoft Graph.
We strongly recommend to use Microsoft Graph option because of Microsoft Online soon deprecation.
Microsoft Graph is a RESTful web API that enables you to access Microsoft Cloud service resources.
Requirements for Office 365 Setup
For Office 365 setup, you need the following in your environment:
- Thick Clients will need to support and have Modern Authentication enabled to allow a federated login.
Not compatible with this integration:
- Hybrid Office 365 deployments;
- Hosted Exchange Server with an Office 365 domain;
- Server 2012 Essentials server that has been federated with Office 365;
- Trial versions of Office 365
Be aware that once this integration is enabled all access to Office 365 will require the use of 2FA via SSO.
Passly set up Federation
- In Passly → SSO Manager → Application Library open your newly created O365 application.
-
Select Federation tab.
-
Choose what do you want to use for Federation: MicrosoftOnline or Microsoft Graph.
Warning: Microsoft Online is planned for deprecation by Microsoft. Please use Microsoft Graph option instead.
Federation via Microsoft Graph
-
Choose Use Microsoft Graph option.
-
Set your Microsoft Graph settings:
- Managed Domain: This is the domain used to identify the tenant;
- Application (client) Id: This is a unique identifier of registered application in Azure Active Directory;
- Directory (tenant) Id: This is a unique identifier of the Azure Active Directory tenant instance;
- If you have multiple domains exist in an O365 instance please select Domain is one of several to be Federated to this Passly organization checkbox for each domain in order to successfully federate the domains.
- Select Verify Compatibility. You should see the following message if the domain information is successfully verified.
- Federate automatically checkbox is selected by default.
- If you want to set up a manual configuration then unselect Federate automatically checkbox and find recommended federation settings for Passly.
- Select Save changes.
Federation via MicrosoftOnline
-
Choose Use Microsoft Online option.
- Set your Microsoft Office 365 Online settings:
-
Managed Domain: This is the domain used to identify the tenant;
- Your @company.onmicrosoft.com username: The *.onmicrosoft.com administrative account username used to synchronize user details;
- Password: The management account password;
- If you have multiple domains exist in an O365 instance please select Domain is one of several to be Federated to this Passly organization checkbox for each domain in order to successfully federate the domains.
- Select Verify Compatibility. You should see the following message if the domain information is successfully verified.
- Federate automatically checkbox is selected by default.
- If you want set up a manual configuration then unselect Federate automatically checkbox and find recommended federation settings for Passly.
-
Use graph for synchronization. You can set up your application using Microsoft Graph API synchronization.
You need to enter the following:
- Application (client) Id: This is a unique identifier of registered application in Azure Active Directory;
- Directory (tenant) Id: This is a unique identifier of the Azure Active Directory tenant instance.
- Select Verify Compatibility. You should see the following message if the domain information is successfully verified.
- Select Save changes.
More information could be found here: Office 365 application: Use Microsoft Graph for Synchronization
Defederation
This will disconnect Passly from Microsoft and switch to standard password authentication.
To defederate a domain:
- Uncheck Federate automatically option;
-
Press Disconnect Passly button.
Passly setup Synchronization
Passly supports synchronizing from the Universal Directory to Office 365.
- Select your Office 365 application.
- Select Synchronization tab.
-
Configure Export:
- Export Groups: Enable or disable group export from Passly to O365.
- Passly Group is synchronized with Office 365 Group: Select criteria for Group Export based on Group Type and Email:
Only if Type and Email match: Group is synchronized by Name and only if Office 365 Group Type and Email match with Passly Group Type and Email.
Regardless of Type and Email: Group is synchronized by Name regardless of its Type and Email.
- If don't match, create a new Group: Passly creates a new Group in Office 365 if no matching Group is found. Otherwise, Passly only creates a new Group if there are no more Groups with the same Name.
- Remove Group Duplicates in Office 365: Passly removes all the Groups from Office 365 which have the same Name with the Office 365 Group that is synchronized with Passly. It means if Passly Group is synchronized with Office 365 Group and there are other Groups with the same Name in Office 365, Passly removes them. All Groups having the same Name that are NOT synchronized with Passly Groups won’t be removed.
- Username Mapping: Select criteria for user mapping if no id is mapped.
- Default User License: A license can be applied to users who are exported Office 365.
- Usage Location: In Azure Portal Usage Location could be found underUser Profile Settings section.
-
Configure Import:
- Enable Import: Enable or disable the one time import. After an import completes, this value will be unchecked. To run the import again, enable this value, configure the additional settings, and save the application;
- Import Groups: Importing groups from Office 365 into Passly will additionally import group membership. CAUTION: Group members will be granted access to any applications or vaults to which that group has been added to;
- Select Passly Group for Imported Users: Any users imported into Passly will be automatically added to this group. If you would like your users to retain access to Office 365, select a group with permission to this application;
- Provisioning Policy: The provisioning policy that will be applied to any users imported into Passly. We advise using a policy which emails users to onboard since imported users will have no password set.
-
Set your desired Deep Linking into Office 365 Applications
Select which applications should show up on the launchpad so users can launch directly into them.
-
Select Permissions.
-
Select Add Groups. Select the Group you chose in Step 1.
- Select Save Changes.
Username attributes
If you are using a non-email format for your Passly usernames like the following:
- john.smith
- jsmith
You need to add a suffix to the organization to enable user synchronization and MFA authentications from thick clients like Skype for Business / Outlook.
Follow these steps to add a Suffix to the organization to support the use of non-email address usernames:
- Select Directory Manager.
- Select Organizations.
- Select the target organization.
- Select Edit
-
Add the Principal Name Suffix to include the @domain.Example:
Note: Use the Office 365 domain that you are federating for the Principal Name Suffix including the @ symbol. - Select Save changes.